This article was originally published by me on Codeburst
After going through Andrei zero to mastery web development course, I decided to practice my Node.js skills by building a todo list app, that has the following features.
- Add and complete a task on a single page
- Store the newly added task in Postgres database
- Uses the express framework
- Uses knex, an SQL query builder for Postgres
- Bootstrap for styling
Basic setup
- Create an empty directory named nodejs-todoList
- Open up the console, navigate to the directory and run npm init
- Fill out the required information to initialize the project
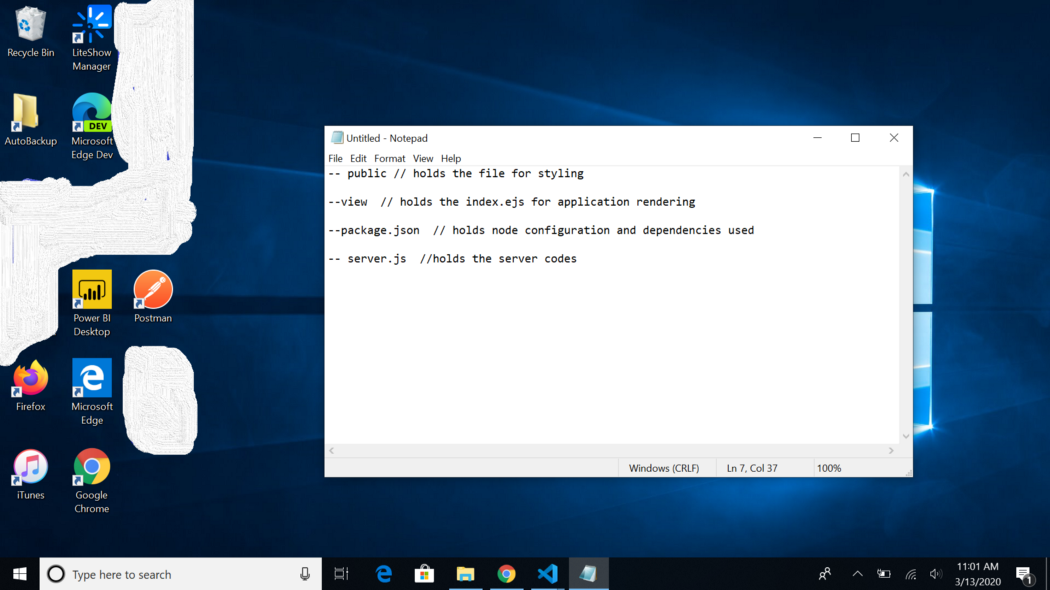
- Within the nodejs-todoList directory, create a new file named server.js — this is where we will put code for routing and other related server stuff.
- Create a view folder where our views get render and a public folder for the style.css since we are using view templating (ejs)
Folder structure: You will need to structure your project as described in the notepad, create a file name style.css in the public folder for CSS styling and then for the application view index.ejs will be saved in the view folder. while our node code will be written in the server.js
Server setup: To get the server up and running we need to install Express. Express is a web framework for Node.js that makes it very easy to run a web server in Node.js. inorder to use express we need to install it in our project
npm install express — saveonce installed, we require it to check if the server is up and running by adding the code to the server.js
const express = require(“express”);
const app = express();
//route to the root
app.get(‘/’, (req, res)=> {
res.send(‘Hello Chisom’);
}
// server port connection
app.listen(8080, ()=> console.log(“app is running on port 8080”));
once the file has been added to test our server
node server.js
// app is running on port 8080
Open your browser and visit localhost:8080 and you will see Hello Chisom N.B for automatically restarting the server and watching files for changes Nodemon can be used. by running this command in your terminalnpm install nodemon and adding “start”: “nodemon server.js”in the package.json script tag. so that by doing npm start immediately runs the nodemon
View setup:
For our view, it is not advisable to respond with plain Html text “Hello Chisom”, when anyone visits our root route, we want to render an Html file that would display our task from the database. so for that, we will be using EJS (Embedded JavaScript). a templating language.
npm install ejs --savethen set up the express to use the template engine in our server.js file
app.set(‘view engine’, ‘ejs’);<!DOCTYPE html>
<html lang=”en”>
<head>
<meta charset=”UTF-8" />
<meta name=”viewport” content=”width=device-width, initial-scale=1.0" />
<title>Todo List</title>
<link rel=”stylesheet” href=”https://maxcdn.bootstrapcdn.com/bootstrap/3.4.1/css/bootstrap.min.css" />
<link href=”/style.css” rel=”stylesheet”/>
</head>
<body>
<div class=”container”>
<div class=”row”>
<form action=”/addTask” method=”POST”>
<div class=”col-md-offset-2 col-md-6 col-sm-offset-1 col-sm-7">
<input type=”text” class=”form-control” name=”textTodo” placeholder=”create new task”/>
</div>
<div class=”col-md-4 col-sm-4">
<button type=”submit” class=”btn btn-md btn-default” >ADD
</button>
</div>
</form>
</div>
<hr />
<div class=”row”>
<div class=”col-md-6 col-sm-6">
<h4>Todo Items</h4>
<ul id=”todo”>
</ul>
</div>
<div class=”col-md-6 col-sm-6">
<h4>Done Items</h4>
<ul id=”done”>
</ul>
</div>
</div>
</div>
<script src=”https://ajax.googleapis.com/ajax/libs/jquery/3.4.1/jquery.min.js"></script>
<script src=”https://maxcdn.bootstrapcdn.com/bootstrap/3.4.1/js/bootstrap.min.js"></script>
</body>
</html>Database setup
In this our application we are going to use the PostgreSQL database. Postgres is an open-source object-relational database system that uses and extends the SQL language combined with many features that safely store and scale the most complicated data workloads. First, we have to install Postgres on our computer over here. Postgres provides us with a management tool called pgAdmin and SQL shell terminal. once that is done you can open the SQL shell, the default Postgres username is “Postgres” and the user password is what you set during the process of installation.
Creating a database
as soon as you have access to Postgres from the terminal, to create a database
CREATE DATABASE dbname;Creating a table:
You have to create a table to store our entries
CREATE TABLE todo(
id SERIAL PRIMARY KEY NOT NULL,
task text UNIQUE,
status INTEGER DEFAULT 0
);
The SERIAL in id helps to set AUTO-INCREMENT on it, while UNIQUE means that we don’t want to have a duplicate of task entries, and status helps me to note newly created task and completed task. Connecting to the database: While using Knex to connect to our database we have to let our application knows that we are using Postgres as a client, so, therefore, we install knex and pg through npm in our application. then connect to our created database in the server.js file
const kenx = require(“knex”);
const db = kenx({
client: “pg”,  // postgres
connection: {
host: “127.0.0.1”,
user: “postgres”,
password: DATABASE PASSWORD HERE,
database: DATABASE NAME HERE
}
});
API routing:
If you are on this page and everything seems fine then we are good to go, the next thing is to update our root route to render our index. ejs file together with our data from our database, if there is any.
app.get(“/”, (req, res) => {
 db.select(“*”).from(“task”).then(data => {
   res.render(“index”, { todos: data });
 }).catch(err => res.status(400).json(err));
});
Here we query our database to render all data from the table, using our knex query builder. by this doing, if there is any item in our database it can then be accessed in a variable called todos in the template. while in the index.ejs file to render our array we have
<% for(var i = 0; i <todos.length; i++){%>
<% if(todos[i].status == 0){ %>
<li>
  <input type=”checkbox” name=”todo” value=”<%= todos[i].id%>”/> <%= todos[i].task%>
</li>
<%} %>
<%} %>
In our
- tags, we place the above code in the todo items section and this for the done items section
<% for(var i = 0; i <todos.length; i++){%>
<% if(todos[i].status == 1){ %>
<li>
  <input type=”checkbox” name=”todo” value=”<%= todos[i].id%>” /> <%= todos[i].task%>
</li>
<%} %>
<%} %>
Add Task Function
From our design layout, we need to be able to submit a form to create a task item. and if you look at the index.ejs file you will notice that our form has an action which it is posting to and a method attribute. it means we now know where our form is posting the request to
<form action=”/addTask” method=”POST”>So we can now set up a post request route, we need to be able to retrieve the user input and for that, we need an express middleware (body-parser) that has access to the req and res bodies to perform more advanced tasks. To use “body-parser”, we must install it first:
npm install body-parser --saveOnce installed, we can require it, and then make use of our middleware with the following line of code in our “server.js”
const bodyParser = require("body-parser");
app.use(bodyParser.urlencoded({ extended: true }));
Now our server.js file will then add to it this code below for creating task
// create new task
app.post(“/addTask”, (req, res) => {
const { textTodo } = req.body;
db(“task”).insert({ task: textTodo }).returning(“*”)
.then(_=> {
   res.redirect(“/”);
}).catch(err => {
    res.status(400).json({ message: “unable to create a new task”
   });
});
});
Testing the app
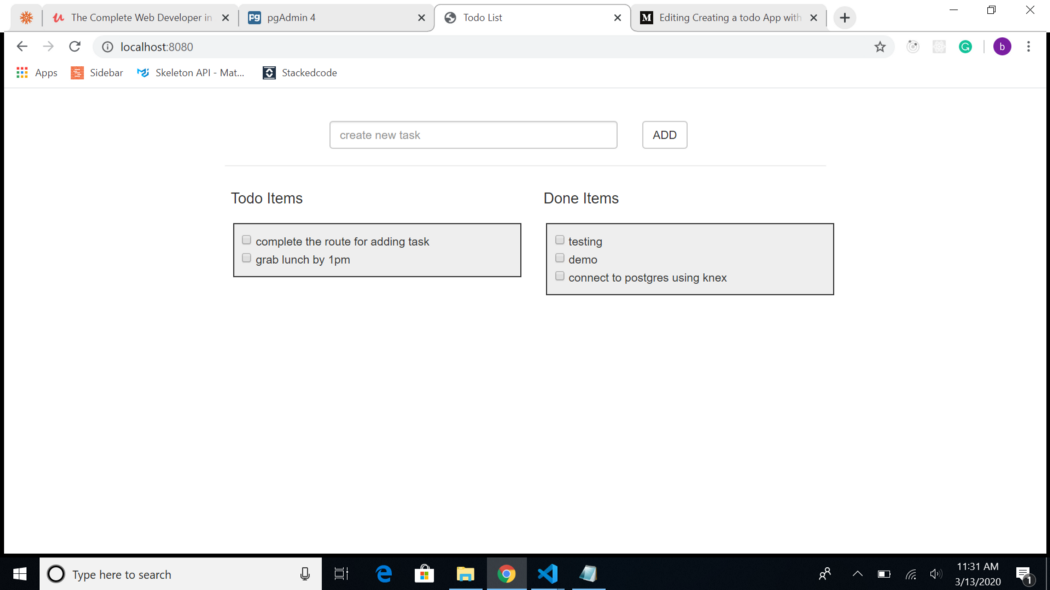
Run node server.jsor if you have nodemon setup then you can simply run npm start then open your browser and visit: localhost:8080, type a new task into the text field and hit enter or click on the button Add, you would see your task being displayed below the Todo Items
Moving a Task Function
After adding a task, we want to be able to move it from a list of todo items to done items and vice versa, we can achieve this by having an onclick method on the checkbox of the view render. we need to update the input tag of the index. ejs file to have a method for the action. onclick=’moveTask(event,”<%= todos[i].id %>”)’
<input type=”checkbox” name=”todo” value=”<%= todos[i].id%>” onclick=’moveTask(event,”<%= todos[i].id %>”)’ /> <%= todos[i].task%>Then we create a put method in the server.js to handle the route for moving tasks.
app.put(“/moveTaskDone”, (req, res) => {
const { name, id } = req.body;
if (name === “todo”) {
  db(“task”).where(“id”, “=”, id).update(“status”,   1).returning(“status”)
.then(task => {res.json(task[0])});
}
else {
db(“task”).where(“id”, “=”, id).update(“status”, 0)
.returning(“status”)
.then(task => {res.json(task[0])});
}
});
In the view, close to the closing tag of the body add this piece of code that triggers the API “moveTaskDone”.
function moveTask (event, id){
const{name} = event.target;
fetch(“http://localhost:8080/moveTaskDone",
{method: “PUT”,
headers: {
“Content-Type”: “application/json”
},
body: JSON.stringify({name, id})
}).then(response => response.json()).then(status=> {
//console.log(status);
window.location.reload()
}).catch(err => console.log(err))
}
Conclusion
By following all the steps mention in this tutorial your server code (server.js) will then look like this
const express = require("express");
const bodyParser = require("body-parser");
const kenx = require("knex");
const db = kenx({
client: "pg",
connection: {
host: "127.0.0.1",
user: "postgres",
password: "DATABASE PASSWORD",
database: "DATABASE NAME"
}
});
const app = express();
app.use(bodyParser.urlencoded({ extended: true }));
app.use(bodyParser.json());
app.set("view engine", "ejs");
app.use(express.static("public"));
// res.render
app.get("/", (req, res) => {
db.select("*").from("task").then(data => {
res.render("index", { todos: data });
}).catch(err => res.status(400).json(err));
});
// create new task
app.post("/addTask", (req, res) => {
const { textTodo } = req.body;
db("task").insert({ task: textTodo }).returning("*")
.then(todo => {res.redirect("/")}).catch(err => {
res.status(400).json({ message: "unable to create a new task" });
});
});
app.put("/moveTaskDone", (req, res) => {
const { name, id } = req.body;
if (name === "todo") {
db("task")
.where("id", "=", id).update("status", 1)
.returning("status").then(task => {res.json(task[0])})}
 else {
db("task").where("id", "=", id).update("status", 0)
.returning("status")
.then(task => {res.json(task[0])});
}
});
app.listen(8080, () => console.log("app is running on port 8080"));
while your view (index.ejs) will then be
<!DOCTYPE html>
<html lang=”en”>
<head>
<meta charset=”UTF-8" />
<meta name=”viewport” content=”width=device-width, initial-scale=1.0" />
<title>Todo List</title>
<link rel=”stylesheet” href=”https://maxcdn.bootstrapcdn.com/bootstrap/3.4.1/css/bootstrap.min.css" />
<link href=”/style.css” rel=”stylesheet”/>
</head>
<body>
<div class=”container”>
<div class=”row”>
<form action=”/addTask” method=”POST”>
<div class=”col-md-offset-2 col-md-6 col-sm-offset-1 col-sm-7">
<input type=”text” class=”form-control” name=”textTodo” placeholder=”create new task”/>
</div>
<div class=”col-md-4 col-sm-4">
<button type=”submit” class=”btn btn-md btn-default” >ADD</button>
</div>
</form>
</div>
<hr />
<div class=”row”>
<div class=”col-md-6 col-sm-6">
<h4>Todo Items</h4>
<ul id=”todo”>
<% for(var i = 0; i <todos.length; i++){%>
<% if(todos[i].status == 0){ %>
<li>
<input type=”checkbox” name=”todo” value=”<%= todos[i].id%>” onclick=’moveTask(event,”<%= todos[i].id %>”)’ /> <%= todos[i].task%>
</li>
<%} %>
<%} %>
</ul>
</div>
<div class=”col-md-6 col-sm-6">
<h4>Done Items</h4>
<ul id=”done”>
<% for(var i = 0; i <todos.length; i++){%>
<% if(todos[i].status == 1){ %>
<li><input type=”checkbox” name=”done” value=”<%= todos[i].id%>” onclick=’moveTask(event,”<%= todos[i].id %>”)’/> <%= todos[i].task%> </li>
<%} %>
<%} %>
</ul>
</div>
</div>
</div>
<script src=”https://ajax.googleapis.com/ajax/libs/jquery/3.4.1/jquery.min.js"></script>
<script src=”https://maxcdn.bootstrapcdn.com/bootstrap/3.4.1/js/bootstrap.min.js"></script>
<script>
function moveTask (event, id){
const{name} = event.target;
fetch(“http://localhost:8080/moveTaskDone", {method: “PUT”,
headers: {
“Content-Type”: “application/json”
},
body: JSON.stringify({
name,
id
})
}).then(response => response.json()).then(status=> {
console.log(status);
window.location.reload()
}).catch(err => console.log(err))
}
</script>
</body>
</html>
I hope this post has been helpful one way or the other, you can view the complete project code on Github.
Thank you for reading.